")
")
")
- In this chapter:
- 1. Why are proper thumb movements so important?
- 2. The rule of soft finger landing on the keys
- 3. Accumulating and releasing energy
- 4. The importance of “arming” the thumb (and any other finger)
- 5. Movements in other planes - synchronization
- 6. What is it like in practice?
- 7. To recapitulate: ✅👍 you can take a “shortcut” !
Phone: open this video in a new window.
1. Why are proper thumb movements so important?
1.1. The thumb is more difficult to control than the other fingers because its structure and mechanics of movement are different. However, it is these differences that will enable us to better illustrate the movements common to the other fingers.
1.2. Optimal and balanced thumb action is crucial for piano technique. During hand rotation (which is actually forearm rotation), the thumb acts in opposition to the other fingers, enabling smooth transfer of the Motor Apparatus (MA) weight - tilting one way facilitates striking with the thumb, while tilting the other way makes it easier to play with the remaining fingers.
1.3. During rotation, it is important to keep the fingertips as close to the keyboard surface as possible. This requires significant flexibility in the metacarpal, an extreme example of which is illustrated in this video excerpt.
1.4. The illustrations below (hover over the image, video) show the extreme positions of hand “arming” - with the metacarpal knuckles either maximally flattened or prominently raised (pushed out).
Computer: move the cursor over the image.
Phone: open the animation.
1.5. Such extreme positions are generally not used in practice, although there are exceptions - here are two examples of using a very flat hand to prepare the attack, which is precisely what I call “arming” the fingers.
1.5.1. My first professor, Bolesław Woytowicz, played with such a hand position. Unfortunately, there is no film documenting this way of playing, but I have done my best to faithfully reproduce it in this short section.
1.5.2. Ignacy Jan Paderewski also used a strongly flattened hand - several sources mention this. Here is Magdalena Samozwaniec’s memory of Paderewski’s recital in Cracow in 1910: “He resembled a lion; with his fingers curved like claws, he attacked the keyboard, often throwing his head back.” (Magdalena Samozwaniec - „Maria and Magdalena” p. 149, Wydawnictwo Literackie, Cracow 1964)
Much earlier, around 1899, the same movement caught the attention of Austrian illustrator Hans Schliessmann:

(in the collection of the National Museum in Warsaw)
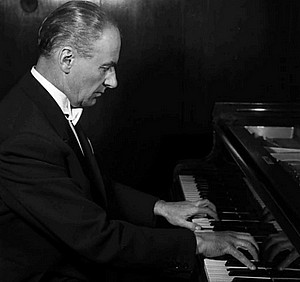
And here is a frame from the 1937 film “Moonlight Sonata” showing the same hand position, although no longer as pronounced:

1.5.3. By the way - Paderewski’s concerts were so immensely popular that additional chairs were placed even on the stage, surrounding the piano. From time to time, without interrupting his playing, the Maestro would fix his hypnotic gaze on listeners seated in his line of sight. They remained under the spell of that look for a long time 😊 This frame of “Moonlight Sonata” gives a good idea of the force of his gaze:

1.6. Returning to the flattened hand: although assuming such an extreme position is not necessary for playing, it serves as excellent exercise for strengthening the metacarpal muscles. However, using these muscles to a lesser extent, to support the fingers, is absolutely essential - a subject I will describe in the following sections.
2. The rule of soft finger landing on the keys
Fingers should not be dropped onto the keys passively, with a vertical downward movement of the entire arm, as the free fall of the MA’s weight leads to a harsh, unpleasant sound. To ensure a soft landing of the thumb (or any other finger):
2.1. Just before striking the key, simultaneously lower the wrist and slightly open the hand by flattening the metacarpal a little. At this point do not strike the key yet. Leave the fingertip resting passively on its surface, as if trying to avoid depressing it. This produces a slight flexion of the finger (the thumb, flexing at its base, closes the “pinch” it forms with the index finger). At the last moment before producing the sound, lightly flatten the fingertip (the distal phalanx), allowing a gentle contact with the pad, which is the most subtle area. All this takes much less time than the description 😊
2.2. Then, as the wrist begins to move upwards (always in a circular trajectory!), we gradually close the hand and straighten the fingers, gently sinking them into the keys.
This is precisely what Liszt meant when he said: “Grab the chord, drawing the fingers slightly inwards towards the palm, and do not let them fall on the keys like lifeless pokers.”
This description always brings to my mind the claws of a climbing cat which can rapidly extend and retract them thanks to a highly elastic tendon-ligament mechanism. Our hand does not have such properties, but imagination can be very helpful here, as in many other cases. Analogous mechanism should also operate at the shoulder level, which should minimally “pull in” and release the weight of the arm.
3. Accumulating and releasing energy
The pianist’s primary source of energy is, of course, the downward fall of the MA’s weight onto the keyboard - i.e. gravity. It does not require any muscular effort, but works exclusively downward.
Here, however, we are talking about muscular movements that:
- complement gravity, directing and coordinating it properly,
- and simultaneously, slow down and cushion the fall of the MA’s weight, enabling sound control and modeling.
To put it very simply:
3.1. The downward movement  (muscular energy accumulation) involves:
3.1.1. A slight lowering of the wrist,
3.1.2. Opening the hand, i.e., flattening it (the metacarpal knuckles become less visible), which makes the fingers raise at the base and curve at other joints.
3.1.2.1. It’s precisely this movement that can be compared to “arming” or “activating” the finger - it resembles stretching a spring or a bow. By the way, the same applies to hand movements from the wrist and even the arm from the shoulder (video).
3.1.2.2. The muscles of the hand, (metacarpal), are stronger than those of the fingers, and it is these muscles, among others, that make it possible to “let the fingers fall freely” - one of the most important elements of Chopin’s method (according to Jan Kleczynski’s testimony).
3.1.3. Curving of the fingers.
3.2. The upward movement  (energy release by lever movement) consists of:
3.2.1. Raising the wrist,
3.2.2. Closing the hand (the metacarpal knuckles become more pronounced),
3.2.3. Straightening the fingers.
👉 IMPORTANT! Even a slight straightening of the fingers automatically leads to ligamental locking, providing an optimal way of playing that minimizes the effort of the finger muscles.
3.3. It does not mean that one of these movements is used for playing and the other for resting! Both directions are combined alternately, but the upward movement () is stronger, providing more energy to the fingers. So we use it to obtain greater dynamics (accents) or to overcome greater technical difficulties.
🚨NOTE!
The above description applies only to the fingers, hand, and wrist. However, the efficiency of these movements depends on the contact between the fingertips and the back muscles, which is achieved through all MA units: fingers, hand, wrist, forearm, and shoulder. It’s only with these basic settings that you can work effectively on your technique. Detailed information on the role of the arm, shoulder, and back will be presented in another chapter.
4. The importance of “arming” the thumb (and any other finger)
“Arming” the thumb (or any finger) for playing is to prepare it for the smoothest and most effective possible connection with the piano mechanism. The pianist should sense the contact with the key at two points of the finger at the same time: the fingertip and the metacarpal knuckle. And this even before he/she actually touches the keyboard. This is the essence of tactile imagination.
However, in order to properly prepare the finger for playing, tactile imagination ought to be preceded by auditory imagination. After all, we differently prepare the finger (and the whole body!) for a soft, single note than for a powerful fortissimo chord.
This “arming” is particularly important when we are changing the hand’s horizontal position on the keyboard - e.g. playing scales and arpeggios*.
* A full description of movements in scales and arpeggios playing will be given in another chapter. In the video for this chapter, I present only small samples.
The previously mentioned opening and closing of the “pincer” (i.e. changing the angle between the thumb and hand), combined with a slight opposite movement of the wrist, ensures a “soft landing” of the hand on the keyboard, i.e. the cushioning of the arm’s weight fall. The playing direction determines the action of the distal (nail) joint of the thumb at the moment when its pad touches the key surface:
4.1. When we play from the center of the keyboard outward (LH 
 RH), the thumb is the first finger of the group and it is on the thumb that the weight of the arm falls after the hand has been moved. This is why we have to arm it before this fall and strike the key with an upward movement (see point 3.2. above) while simultaneously opening the pincer (slightly moving the thumb away from the hand) and straightening the thumb at the distal joint.
4.1.1. Thanks to a slight wrist lift, this method of cushioning slows down the weight’s fall gently, eliminating thus unwanted thumb accents when changing positions in this direction.
4.1.2. In addition to cushioning, the thumb also pushes the hand in the playing direction - either from the key’s bottom or (in very fast tempos) from the inertia of a not fully depressed key. This is an additional advantage supporting the lateral movement of the arm and facilitating a smooth transition to the next position.
4.2. And when we play in the opposite direction (LR PR), the thumb strikes the key as the last finger of the group and works in the opposite direction: it touches the key surface by closing the pincer and bending at the distal joint, which also helps move the hand in the direction of the playing.
4.3. Hence, a very important rule: ❌ never stiffen the thumb (or another finger) at its base, as this leads to uncontrolled tension and restricts freedom of movement. It severely disturbs the fluidity of playing and sound evenness. The same principle applies to the base joints (knuckles) of the other fingers as well.
5. Movements in other planes - synchronization
The movements described above concern the planes in which the fingers move. These movements must interact with movements in other planes, including:
- Hand rotation,
- Hand adduction and abduction,
- Semicircular and circular wrist and arm micromovements,
- Opening and closing of the arm at the elbow,
- Impulses flowing from the shoulder and back.
A complete description of sound production will be presented in another chapter. However, it must be stressed that perfect arm suspension in the shoulder (playlist) and impulses from the shoulder are essential for the correct execution and coordination of these movements.
6. What is it like in practice?
Watching my video examples (some in slow motion), you may notice that except in the places where I deliberately exaggerate the thumb arming, this technical element is either almost or completely unnoticeable. Why?
6.1. Already in 1932 Tobias Matthay pointed out the distinction between what is visible and invisible in piano technique (“The Visible and Invisible in Piano Technique”).
6.2. In performance practice, the fingers may be more or less curved and the knuckles more or less visible. However, this does not change the effectiveness of the metacarpal. On the contrary! I always say that ❌ too large movements disturb rather than help playing.
6.3. With a lot of experience and the use of throwing movements (my article / playlist) the arming of the fingers occurs almost automatically. You do not need to think about it or stimulate it then, but of course, the acquisition of this technique is the result of the principles given above.
6.4. Besides, many practice and performance methods require the pupil’s imagination to help him/her identify and understand a given problem. At high speeds, when the hand is governed by lightning-fast reflexes, practice movements may become completely invisible - they are either too small or too fast to be seen.
6.5. Here’s an excellent example of fingers arming Lang Lang’s performance. To see it better, you can slow down the video to 0.25.
7. To recapitulate: ✅👍 you can take a “shortcut” !
It is possible to replace the entire procedure described above with a trick in which you need to control one parameter only. This is a kind of “shortcut” that sometimes brings very good results, so nothing prevents you from testing it.
7.1. To play cleanly, every pianist must develop the habit of minimally raising the fingers that are not to play. That avoiding of “little fingers sympathetic” (as Neuhaus called them) results not only in clean playing, but also in automatic arming of all fingers. Always, in every situation, not just when playing intervals or chords. It also gives a clear, limpid sound and transparent technique.
** For the exercise, you can raise the non-playing fingers a bit higher, but you must be very careful not to damage your tendons!
🚨NOTE! The tip of the “armed” finger must be very close to the surface of the key. Otherwise, instead of “arming” the finger, you will over-articulate with it, which is very detrimental to the technique.
7.2. In general, we should focus less on fingers bending, which in most cases should be replaced by ligamental locking (see point 3.2.3 above), and more on fingers extension necessary much more often:
- both before producing the sound to “arm” the fingers that will play and raise the others,
- and after the sound, to control the note’s length and articulation.